Learn How to Create Your Own Fuzzy Velvet Coloring Poster!
In this tutorial I take you step-by-step through my process of turning a photograph into a velvet coloring page!
Disclaimer: Some links provided are affiliate links and I receive a small commission when used. These commissions help to support the free content I offer!
Step 1. Select a Photo or a Coloring Page
The first step is to decide what you would like your design to be. I decided to make my design from scratch and started with a photo of our beloved family dog Zoey. To create a coloring page from this photo I used a service called Fiverr, where you can hire artists to create drawings and coloring pages for you! The artists username I used was Camstinio, and I would highly recommend her work! I requested a coloring page of Zoey with a landscape of trees and grass in the background and I think it turned out amazing!
Step 2. Simplify the Coloring Page
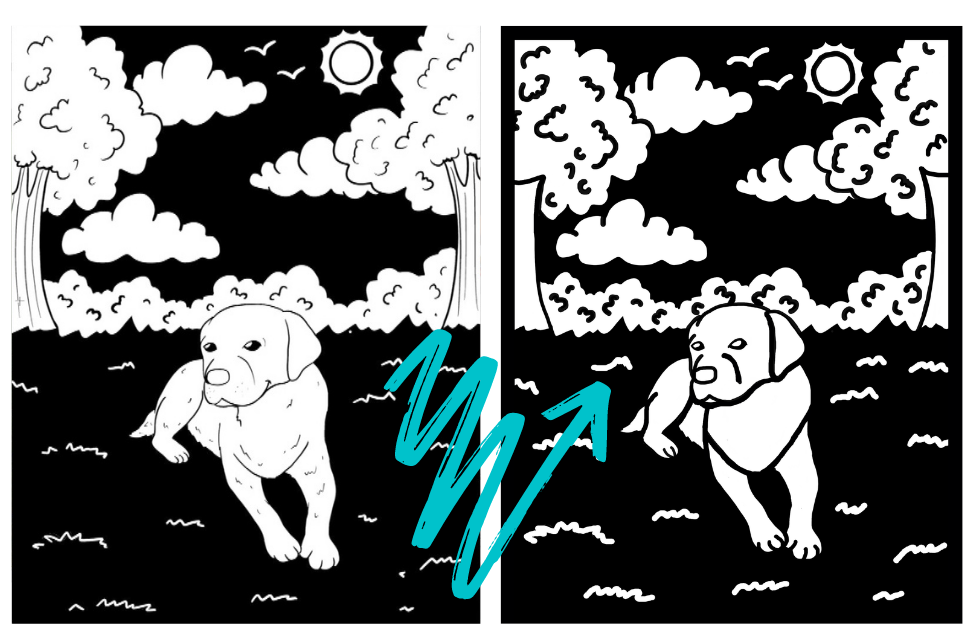
Before you begin to cut out the drawing on a Cricut machine make sure the drawing has a solid black border, thick black lines, and adequate spacing between components. This crucial set-up will ensure that the Cricut can cut out your full design, and that you can easily transfer the velvet sticker onto poster board paper later on.
This is my design before and after simplifying it.
Step 3. Upload the design into Cricut Design Space
The next step is to take the coloring page you have simplified and edited in Step 2 and upload it to be cut in Cricut Design Space.
Open a ‘New Project’
Select ‘Upload’, then select ‘Upload Image’, then ‘Browse’ for the image on your computer
When prompted to ‘Select Image Type’ select the ‘Simple’ option then press ‘Continue’
On the ‘Select & Erase’ page, select each of the white portions of your coloring page that need to be cut out. As you click on each one the background should switch from white to transparent (small gray and white squares)
Select the ‘Save as a Cut Image’ option, name your image, then press ‘Save’
Now that the design is uploaded, go the ‘Recently uploaded images’, select the image, and press ‘Insert Images’
Use the ‘Size’ options along the top toolbar to scale the image to smaller than the size of your velvet sticker sheets. Use the ‘Position’ options to place the scaled image at the X = 0, Y = 0 position
Once your image is ready to be cut, press ‘Make It’ in the upper right corner. There is no ‘Velvet Sticker’ option in Cricut Design Space, but I have found that the ‘Craft Foam’ with the ‘Deep Knife Blade’ works well to cut the sheets
Peel the backing off of the velvet sticker paper and align the sticker paper (sticky side down towards the mat) with the upper left hand corner of the Light Grip cutting mat
Load the mat into the Cricut and begin the cut
Step 4. Assemble the Drawing
Cut a piece of white poster board paper to be slightly larger than the coloring page you are creating. Unload the Cricut cut out and use a weeder to lift the outermost portion of the velvet sticker from the mat and stick onto the poster paper. After the main section of the coloring page is placed, use the weeder to transfer each of the remaining detail lines from the mat onto the poster board paper. Once complete, trim the poster board paper to size.


